
Mark Bishop
Analytical Chemistry and
Signal Acquisition/Analysis
Connect to your remote computer easily and securely.
May 2013
Say you want to logon to your computer from a somewhere else. You would rather not go through some Internet service that may be compromised. You don't want a bad guy to easily be able to logon instead of you. You don't want someone (your ISP or your neighbors) to listen-in to your session while you are logged in. Here is a practical approach that we use that is essentially glitch-free and will run on Linux or Windows.
Definitions:
Host: The computer that is somewhere else. You want to connect to this computer.
Client: The machine you are sitting at. You will connect to the host from this computer.
General:
There are many reasons why you might want to connect to a remote computer. The most common reasons? You want to get your files, you want to administer the machine, you want to proxy your Internet connection, or you want to open a remote desktop session and act as though you were seated at the machine... doing the usual things you do when you are there. There is another possibility; you have another computer that is not connected to a monitor, keyboard, or mouse.
Before we can do any of these things, we have to establish a communication channel with the host. Think of it like a telephone number and extension. It has to be setup before we can make a call and have a conservation. With computers, the telephone number is your machine's IP address. The extension is the port and will vary depending on the kind of remote conversation you want to have (remote desktop, file transfer, etc.)
Here's a diagram of our system:
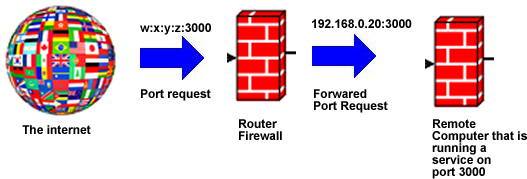
The connection flow includes:
- From elsewhere, we request a conversation using an address that has the form WWW.XXX.YYY.ZZZ:PORT, where WWW.XXX.YYY.ZZZ is our remote computer's external IP address and PORT (e.g., 3000) is an identifier that we have associated with a service running on the remote computer that accepts connections. Note: you will need a means of determining the remote machine's external IP address. We usually use the DynDns.com service.
- Good routers will, by default, reject incoming port requests using a firewall. We need to configure the router to allow this port and we need to tell it where to send the request (ie., what local machine should get it). Note: we will need to set our host's LAN IP address statically so that the router will consistently forward the request to the right machine. In the diagram above we have set the remote computer so that it always has a LAN address of 192.168.0.20.
- We need to configure the remote computer so that it knows what to do when the request arrives. We will also lock out any other external requests to this machine.
In setting up, we will configure the host to accept connections. Then, stepwise, we will make the remote connection available to the network.
When we make a connection, we want it to be private. Also, we want to be reasonably assured that unauthorized users can't connect. To do this, we will use a protocol called key-authenticated secure shell (SSH). SSH enables us to encrypt our communications. When we setup SSH, we will configure it to require cryptographic keys rather than a simple password when it authenticates a potential user. Don't worry, you won't have to remember the key or type it when you connect.
SSH will be the only service exposed by the host to the outside world. Every other service/port we wish to use will be channeled (tunneled) through this secure shell. When you obtain a secure shell on (ssh into) a machine, you have access to any service ports on that machine, even if they are firewalled.
For this tutorial, let's decide that our SSH port will be 3000 .
Firewall
Configure the firewall to deny all incoming ports except 3000.
Linux
If your remote machine is Linux, you probably have ufw (uncomplicated firewall) installed. If not, consider installing it. Most firewall administrative menu items are simply GTK front ends for ufw.
~$ sudo ufw status
Status: inactive
~$ sudo ufw enable
Firewall is active and enabled on system startup
~$ sudo ufw
default deny
Default incoming policy changed to 'deny' (be sure
to update your rules accordingly)
~$ sudo ufw allow in to any
port 3000
~$ sudo ufw status verbose
Status: active
Logging: on (low) Default: deny (incoming), allow (outgoing)
New
profiles: skip
To Action From
-- ------ ----
3000 ALLOW IN Anywhere
3000 ALLOW IN Anywhere (v6)
Windows
The Windows firewall will vary from version to version. The firewall is on and set to deny incoming connections by default – with certain services/ports open for program access. Verify this then add a new rule that allows incoming connections on port 3000.
Getting to your guest with ssh
Just what is this port we are opening in the above networking example? It could be any service (e.g. an ftp server). In our organizations and our homes, we don't like to expose service ports to the greater world. The only port we expose is a secure shell port. Again, we use SSH to tunnel the other necessary ports on the host to the client. Then, we set our client applications to use the tunneled port. For all non-SSH services provided by the host, we will act as though they are being provided locally – making the connection to localhost and not the host's IP. Essentially, we are using a local port as a proxy and encrypting communications with the host through the SSH service.
For example, we can have a remote desktop server running on the host at port 5900. Incoming connections to port 5900 can be firewalled so the service cannot be constantly interrogated by a "bad guy." When you ssh into a machine, you can tunnel the remote port to a local port, perhaps port 5092. Now you can connect to the remote desktop at localhost:5092.
Install & Configure OpenSSH-server on the host
With Linux you can use your package manager. With Windows we will use Cygwin to get a Unix-like virtual utility that will support OpenSSH. This Windows setup is a bit more involved. Appendix A gives a recently tested install procedure for Cygwin.
Use public key authentication and not password authentication. For additional security, I prefer my keys to be password protected to buy time to change all of my hosts if I am careless with my keys.
- Install openssh-server (or Cygwin) on the host. With Linux you can use your package manager. Windows will be a bit more involved (see Appendix A).
- Edit /etc/ssh/sshd_config or c:\cygwin\etc\sshd_config*
- After edits, run sudo restart ssh, or service ssh restart (or restart the Cygwin service if you are running Windows). Alternatively, you can reboot.
*A default example sshd.config file is created when you install OpenSSH-server. We need to customize it. Lines beginning with '#' are comments placed in the file for the reader's guidance. The uncommented lines define your custom configurations. Here are the lines that are uncommented in my file:
Port 3000
Protocol 2
HostKey /etc/ssh/ssh_host_rsa_key
HostKey /etc/ssh/ssh_host_dsa_key
HostKey
/etc/ssh/ssh_host_ecdsa_key
UsePrivilegeSeparation yes
KeyRegenerationInterval 3600
ServerKeyBits 2048
SyslogFacility AUTH
LogLevel INFO
LoginGraceTime 120
PermitRootLogin no
StrictModes yes
RSAAuthentication yes
PubkeyAuthentication yes
AuthorizedKeysFile
%h/.ssh/authorized_keys
IgnoreRhosts yes
RhostsRSAAuthentication no
HostbasedAuthentication no
PermitEmptyPasswords no
ChallengeResponseAuthentication no
PasswordAuthentication no
X11Forwarding yes
X11DisplayOffset 10
PrintMotd no
PrintLastLog yes
TCPKeepAlive yes
AcceptEnv LANG LC_*
Subsystem sftp
/usr/lib/openssh/sftp-server
UsePAM no
Make note that in this list we have specified our port: 3000. Also see that we have disabled password authentication (PasswordAuthentication no) and we have specified where to find the authorized public keys that the SSH server will accept: AuthorizedKeysFile %h/.ssh/authorized_keys.
The changes above are for a Linux install, but they work with the Windows/Cygwin configuration too, provided you change four lines because they point to files on the system that will be located in other places:
- HostKey /etc/ssh_host_rsa_key
- HostKey /etc/ssh_host_dsa_key
- HostKey /etc/ssh_host_ecdsa_key
- AuthorizedKeysFile /home/authorized_keys
Verify that those paths point to the correct files. Note that the Cygwin root directory.'/', is located at c:/cygwin/ and all file specifications are relative to that.
I will be using Putty to configure, manage, and open my SSH connections. Seasoned Linux users may wince, preferring a command line approach. I like Putty and it is included in the default repositories for most common Linux distributions. With Windows, you will need to get it from the Putty site (http://www.chiark.greenend.org.uk/). Putty is a very useful, well designed GUI that provides a cross-platform, portable SSH management system. You can set the SSH terminal preferences individually for connections to different servers.
Putty is a client application. You don't need to install it on the host machine. Only OpenSSH needs to be running on this machine. In this tutorial, we will install Putty on the host, simply because it will give us a way to do a preliminary configuration test right at the host.
Creating your SSH keys with Putty
Your master key for connecting to a machine is a single-file key pair. It has encoded within it both a private key and a public key. This master key file will be given the file extension .ppk. You can carry it with you on a thumb drive (but don't loose it). One time only, when you set-up the host, you configure it to reject all other keys (and passwords) by pre-authorizing your access using your public key. You can make your public and private Putty keys from any machine. In this tutorial, I am doing this at the machine that will be the host.
Linux:
- Make the key pair: puttygen -t dsa -b 2048 -P -O private -o NewNameKeyPair.ppk (This is the key you carry with you. Making the key will take a while.) When it completes, provide a memorable password. This password will not allow you to log into a machine. It simply unlocks the master key.
- Export its public part as an openssh public key: 'puttygen NewNameKeyPair.ppk -O public-openssh -o NewPublic.pub' (This is the key you will use for one-time-only pre-authroization.)
- Copy NewPublic.pub on the host and save it as /home/user/.ssh/authorized_keys (or C:\cygwin\home\authorized_keys for Windows hosts).
- With Linux hosts, YOU MUST ensure permissions are
correct on the .ssh folder and the authorized_keys file:
- $ sudo chmod 755 $HOME $HOME/.ssh
- $ sudo chmod 600 $HOME/.ssh/authorized_keys
Windows:
Use the handy puttygen GUI to make the key pair (.ppk). Save it and export the public part (.pub). Bring the public key to the host and save it as "C:\cygwin\home\authorized_keys."
Let's test it now that we're at the half-way point.
Start the Putty GTK program from within the host.
- Under the Session category, enter localost for the host name and the SSH port (eg 3000).
- Enter a name in the saved sessions box and save it.
- At Connection → SSH:
- Pick “2 only” for the SSH protocol
- Under Auth, in the private key box, browse to the Putty key you made (NewNameKeyPair.ppk). Note, this is the key pair (extension ppk) you made and not the public key you copied to the “authorized_keys” file on the server.
- Save the configuration again then click Connect.
- Accept the warning.
- Enter your user name.
- You will be prompted for a password. Enter the key's password, not
your system password.
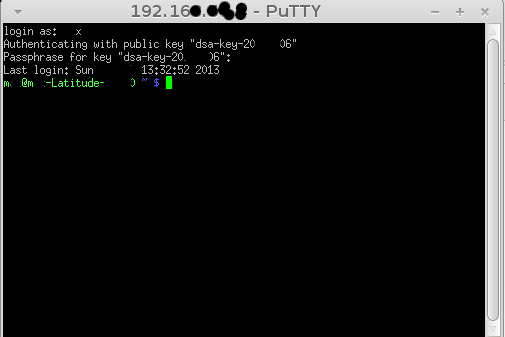
You now have a command prompt... on the host! If you know how to get administrative privileges, you can do anything you want with/to this machine. That's why we insist on SSH with key-authentication. (When a bad guy installs maleware that does this without your consent, it's called a back door.)
In the test, we entered the key's password and not the system's password. Convince yourself that you cannot reach this machine without the authorization key (try to connect after moving the ppk key to a different folder on your computer).
If the test doesn't work, be sure you have restarted the SSH server/service. If you still have trouble, retrace all of the steps from the beginning. You can ignore the firewall settings. They don't apply to connections to localhost. If the connection is refused, then your SSH server isn't setup properly, isn't running, or you have the wrong port. If you see no authentication methods available, then you probably have to set the permissions on the .ssh folder and the authorized keys file (see above).
Notes:
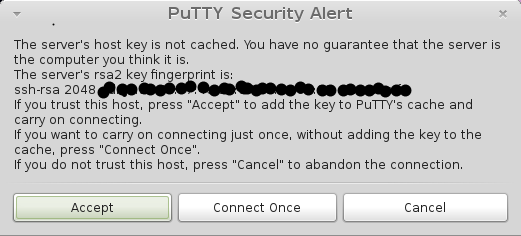
- When you first connect to a server from Putty a warning will appear saying that you have no guarantee that the server is legitimate. To check a server's rsa fingerprint (for subsequent trust as a known server on a remote machine), run: ssh-keygen -lf /etc/ssh/ssh_host_rsa_key from the Putty terminal.
- To remove a previously accepted fingerprint in Linux Putty, edit .putty/sshhostkeys and delete the offending fingerprint. If you are using Putty in Windows you will need to hack the registry to untrust a key.
- To get to the underlying Windows directories from a Cygwin ssh session: cd /cygdrive/c
Getting the host on the network
In the example above we logged into the host from the same machine. This is not very useful, but it allows us to correct errors in the SSH server's configuration before the additional variables associated with network connections compound troubleshooting complexity. If it worked for you, then you are ready to expand the host's availability to the network and Internet level.
Give your host a static address on the LAN (example: 192.168.0.20).
Open your router interface and forward all incoming requests on port 3000 to your host's static IP.
From a different client machine, install Putty and open the Putty GUI:
- Under the Session category, put in the host's IP and the forwarded port (eg 3000). Enter a name in the saved sessions box and save it.
- Under the terminal and Window category, start with the defaults.
- Under Connection → Data, you can put in your host's login name to save a step at login if you wish.
- At Connection → SSH:
- Pick “2 only” for the SSH protocol
- Under Auth, in the private key box, browse to the Putty key you made (NewNameKeyPair.ppk).
- I often open a tunnel port for a browser proxy, eg 8084 [SSH → Tunnels: (Dynamic & Auto) Source port 8084]
- I often open a tunnel port for an svftpd file transfer proxy, eg 4000 [SSH → Tunnels: (Dynamic & Auto) Source port 4000]
- When the host is Linux, I like the ability to reach the desktop
with Remmina.
- SSH → Tunnels: (Local & Auto) Source port = 5092, Destination port: localhost:5900
- SSH → X11: check Enable X11 Forwarding
- When the host is Windows, I like to be able to access Windows
remote desktop.
- SSH → Tunnels: (Local & Auto) Source port = 3390, Destination port: localhost: 3389
- Save the configuration again before connecting.
If all is well, you can connect in the same manner as you did in the test above. If not and you succeeded in the half-way point test, then you know that the problem is network routing, firewall settings, or your Putty session's configuration.
Using tunnels
The real power of SSH is it enables us to use services on the host that are firewall-protected from the network/Internet. Services like VNC remote desktops, ftp servers, etc. are not secure. Passwords can be sniffed or cracked. Traffic isn't necessarily encrypted. But tunneling these services through SSH provides an encrypted channel for the use of the services. Better still, when you use key-authenticated SSH to tunnel the services, you only pass your clear text password to the localhost.
Another important use of an SSH tunnel is using a tunneled port as a web browser proxy. Say you are on a potentially hostile network but your host is not. Browser traffic is pretty transparent to eavesdroppers. Even SSL (https) traffic can be interpreted by bad guys if they can subvert your browser's certificate policies. If you have an SSH connection to a host on a safer network then, using a dynamic tunnel, you can browse the web and the local bad guy will only see a stream of nonsensical tcp packets. Another advantage for some is, you can browse the web as though you are located at the host's address. You reveal reverse DNS information to the sites you visit. If you are on the moon and some earth websites block (or discriminate against) moon people, then looking like you are from earth is advantageous.
See Using SSH tunnels to securely access a remote computer's services to learn how to use these tunnels.
Appendix A, installing Cygwin in Windows
Use the Cygwin site as a primary reference for installing. Below is simply a summary of an approach that worked for me.
Download setup.exe and setup.exe.sig, then check the signature.
Double click it. You will be presented with a choice mirror sites to
download from. Pick one that is near you and, preferably, one you
recognize and trust.
During setup, you will be given a dialog window for choosing additional
programs. Add openssh (net), rsync (net), and nano (editor). Type the
names in the window search box to find them.
After the installation is done, navigate to C:/Cygwin and double click the Cygwin.bat file.
Next find the Cygwin desktop icon (or start menu item) and Run As Administrator. In the terminal that opens, run ssh-host-config. There will be a series of mostly yes or no questions that may vary depending on the Windows version and previous installation history. In general, the answers are "yes." One line will prompt; "Enter the value of CYGWIN for the daemon: []." I respond with: "ntsec tty." I used my Windows password when asked to enter one. Here is the output from a Windows 7 install:
*** Query: Overwrite existing /etc/ssh_config file? (yes/no) yes
*** Info: Creating default /etc/ssh_config file
*** Query: Overwrite existing /etc/sshd_config file? (yes/no) yes
*** Info: Creating default /etc/sshd_config file
*** Info: Privilege separation is set to yes by default since OpenSSH 3.3.
*** Info: However, this requires a non-privileged account called 'sshd'.
*** Info: For more info on privilege separation read /usr/share/doc/openssh/README.privsep.
*** Query: Should privilege separation be used? (yes/no) yes
*** Info: Note that creating a new user requires that the current account have
*** Info: Administrator privileges. Should this script attempt to create a
*** Query: new local account 'sshd'? (yes/no) yes
*** Info: Updating /etc/sshd_config file
*** Query: Do you want to install sshd as a service?
*** Query: (Say "no" if it is already installed as a service) (yes/no) yes
*** Query: Enter the value of CYGWIN for the daemon: [] ntsec tty
*** Info: On Windows Server 2003, Windows Vista, and above, the
*** Info: SYSTEM account cannot setuid to other users -- a capability
*** Info: sshd requires. You need to have or to create a privileged
*** Info: account. This script will help you do so.
*** Info: You appear to be running Windows XP 64bit, Windows 2003 Server,
*** Info: or later. On these systems, it's not possible to use the LocalSystem
*** Info: account for services that can change the user id without an
*** Info: explicit password (such as passwordless logins [e.g. public key
*** Info: authentication] via sshd).
*** Info: If you want to enable that functionality, it's required to create
*** Info: a new account with special privileges (unless a similar account
*** Info: already exists). This account is then used to run these special
*** Info: servers.
*** Info: Note that creating a new user requires that the current account
*** Info: have Administrator privileges itself.
*** Info: No privileged account could be found.
*** Info: This script plans to use 'cyg_server'.
*** Info: 'cyg_server' will only be used by registered services.
*** Query: Do you want to use a different name? (yes/no) no
*** Query: Create new privileged user account 'cyg_server'? (yes/no) yes
*** Info: Please enter a password for new user cyg_server. Please be sure
*** Info: that this password matches the password rules given on your system.
*** Info: Entering no password will exit the configuration.
*** Query: Please enter the password:
*** Query: Reenter:
*** Info: User 'cyg_server' has been created with password '************'.
*** Info: If you change the password, please remember also to change the
*** Info: password for the installed services which use (or will soon use)
*** Info: the 'cyg_server' account.